An Introduction to Specimen Preparation

There are many reasons to examine human cells and tissues under the microscope. Medical and biological research is underpinned by knowledge of the normal structure and function of cells and tissues and the organs and structures that they make up. In the normal healthy state, the cells and other tissue elements are arranged in regular, recognizable patterns. Changes induced by a wide range of chemical and physical influences are reflected by alterations in the structure at a microscopic level, and many diseases are characterized by typical structural and chemical abnormalities that differ from the normal state. Identifying these changes and linking them to particular diseases is the basis of histopathology and cytopathology, important specializations of modern medicine. Microscopy plays an important part in haematology (the study of blood), microbiology (the study of microorganisms including parasites and viruses), and more broadly in the areas of biology, zoology, and botany. In all these disciplines, specimens are examined under a microscope.
Microscopy
There are many different forms of microscopy, but the one most commonly employed is “brightfield” microscopy where the specimen is illuminated with a beam of light that passes through it (as opposed to a beam of electrons as in electron microscopy). The general requirements for a specimen to be successfully examined using brightfield microscopy are:
- That the cells and other elements in the specimen are preserved in a “life-like” state (this process is called “fixation”)
- That the specimen is transparent rather than opaque, so that light can pass through it
- That the specimen is thin and flat so that only a single layer of cells is present
- That some components have been differentially coloured (stained) so that they can be clearly distinguished
Preparation options
Because of the microscopy requirements, options for preparing specimens are limited to:
- Whole-mounts, where an entire organism or structure is small enough or thin enough to be placed directly onto a microscope slide (e.g., a small unicellular or multicellular organism or a membrane that can be stretched thinly on to a slide)
- “Squash” preparations, where cells are intentionally squashed or crushed onto a slide to reveal their contents (e.g., botanical specimens where cells are disrupted to reveal chromosomes)
- Smears, where the specimen consists of cells suspended in a fluid (e.g., blood, semen, cerebrospinal fluid, or a culture of microorganisms), or where individual cells have been scraped, brushed, or aspirated (sucked) from a surface or from within an organ (exfoliative cytology). Smears are the basis of the well-known “Pap test” that is used to screen for cervical cancer in women
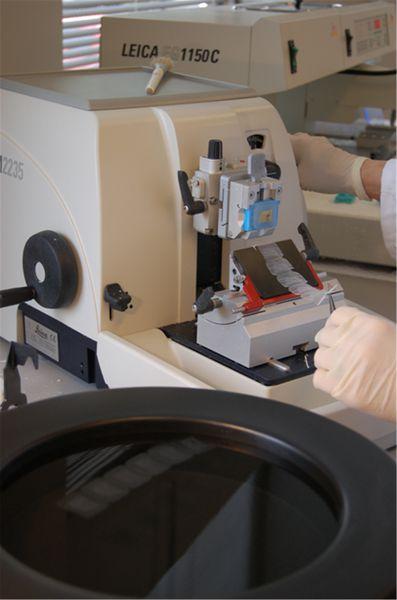
- Sections, where specimens are supported in some way so that very thin slices can be cut from them, mounted on slides, and stained. Sections are prepared using an instrument called a “microtome.”
Of these options, only whole-mounts and sections preserve the structural relationships between individual cells and extracellular components. Smears and squash preparations provide detail about individual cells and relative cell numbers, but structural relationships are lost. The preparation of sections is the most technically complicated of these methods as it requires specialized equipment and considerable expertise. The microscopic examination of sections by a pathologist forms the cornerstone of cancer diagnosis. Although the methodology for preparing sections from both animal and plant material is similar, the following description relates to animal (human) tissues.
Section preparation
Most fresh tissue is very delicate, easily distorted, and damaged. Thus, it is impossible to prepare thin sections (slices) from it unless it is supported in some way whilst it is being cut. Usually, the specimen also needs to be preserved or “fixed” before sections are prepared. Broadly, there are two strategies that can be employed to provide this support.
1. The tissue can be rapidly frozen and kept frozen while sections are cut using a cryostat microtome (a microtome in a freezing chamber). These are called “frozen sections”. Frozen sections can be prepared very quickly and are therefore used when an intra-operative diagnosis is required to guide a surgical procedure or where any type of interference with the chemical makeup of the cells is to be avoided (as in some histochemical investigations).
2. Alternatively, specimens can be infiltrated with a liquid agent that can subsequently be converted into a solid that has appropriate physical properties that will allow thin sections to be cut from it. Various agents can be used for infiltrating and supporting specimens, including epoxy and methacrylate resins, but paraffin wax-based histological waxes are the most popular for routine light microscopy. This produces so-called “paraffin sections”. These sections are usually prepared with a “rotary” microtome. “Rotary” describes the cutting action of the instrument. In all histopathology laboratories, paraffin sections are routinely prepared from almost every specimen and used in diagnosis.
The following paragraphs describe the major steps in preparing paraffin sections. These steps generally dictate the layout and workflow in large, specialist histopathology laboratories where hundreds of specimens are handled every day.


Specimen reception
Specimens received for histological examination may come from a number of different sources. They range from very large specimens or whole organs to tiny fragments of tissue. For example, the following are some of the specimen types commonly received in a histopathology lab.
- Excision specimens (surgical biopsies), where whole organs or affected areas are removed at operation
- Incisional biopsy specimens, where tissue is removed for diagnosis from within an affected area
- Punch biopsies, where punches are used to remove a small piece of suspicious tissue for examination (often from the skin)
- Shave biopsies, where small fragments of tissue are “shaved” from a surface (usually skin)
- Curettings, where tissue is removed in small pieces from the lining of the uterus or cervix
- Core biopsies, where a small tissue sample is removed using a special needle, sometimes through the skin (percutaneously)
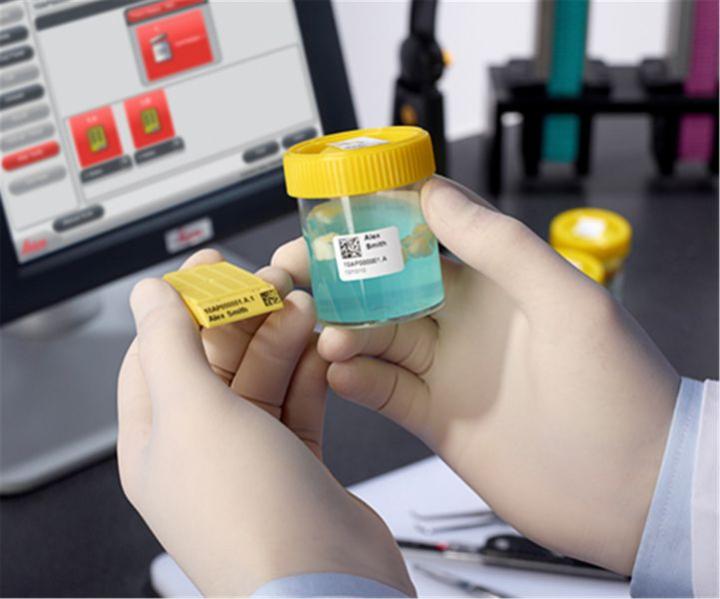
Specimens are usually received in fixative (preservative) but sometimes arrive fresh and must be immediately fixed. Before specimens are accepted by a laboratory, the identification (labeling) and accompanying documentation will be carefully checked, all details recorded, and “specimen tracking” commenced. It is vital that patient or research specimens are properly identified, and the risk of inaccuracies minimized.

Fixation
Fixation is a crucial step in preparing specimens for microscopic examination. Its objective is to prevent decay and preserve cells and tissues in a “life-like” state. It does this by stopping enzyme activity, killing microorganisms, and hardening the specimen while maintaining sufficient molecular structure to enable appropriate staining methods to be applied (including those involving antigen-antibody reactions and those depending on preserving DNA and RNA). The sooner fixation is initiated following the separation of a specimen from its blood supply, the better the result will be. The most popular fixing agent is formaldehyde, usually in the form of a phosphate-buffered solution (often referred to as “formalin”). Ideally, specimens should be fixed by immersion in formalin for six to twelve hours before they are processed.

Grossing
Grossing, often referred to as “cut-up”, involves a careful examination and description of the specimen that will include the appearance, the number of pieces, and their dimensions. Larger specimens may require further dissection to produce representative pieces from appropriate areas. For example, multiple samples may be taken from the excision margins of a tumour to ensure that the tumour has been completely removed. In the case of small specimens, the entire specimen may be processed. The tissues selected for processing will be placed in cassettes (small perforated baskets), and batches will be loaded onto a tissue processor for processing through to wax.

Processing
Where large batches of specimens are processed for paraffin section preparation, automated instruments called “tissue processors” are used. These instruments allow the specimens to be infiltrated with a sequence of different solvents finishing in molten paraffin wax. The specimens are in an aqueous environment to start with (water-based) and must be passed through multiple changes of dehydrating and clearing solvents (typically ethanol and xylene) before they can be placed in molten wax (which is hydrophobic and immiscible with water). The duration and step details of the “processing schedule” chosen for a particular batch of specimens will depend on the nature and size of the specimens. Schedules can be as short as one hour for small specimens or as long as twelve hours or more for large specimens. In many labs, the bulk of processing is carried out overnight. At present, there is considerable pressure on laboratories to use processors capable of rapid processing in an effort to improve workflow and reduce turnaround times.

Embedding
After processing, the specimens are placed in an embedding center where they are removed from their cassettes and placed in wax-filled molds. At this stage, specimens are carefully orientated because this will determine the plane through which the section will be cut and ultimately may decide whether an abnormal area will be visible under the microscope. The cassette in which the tissue has been processed carries the specimen identification details, and it is now placed on top of the mold and is attached by adding further wax. The specimen “block” is now allowed to solidify on a cold surface, and when set, the mold is removed. The cassette, now filled with wax and forming part of the block, provides a stable base for clamping in the microtome. The block containing the specimen is now ready for section cutting.

Sectioning
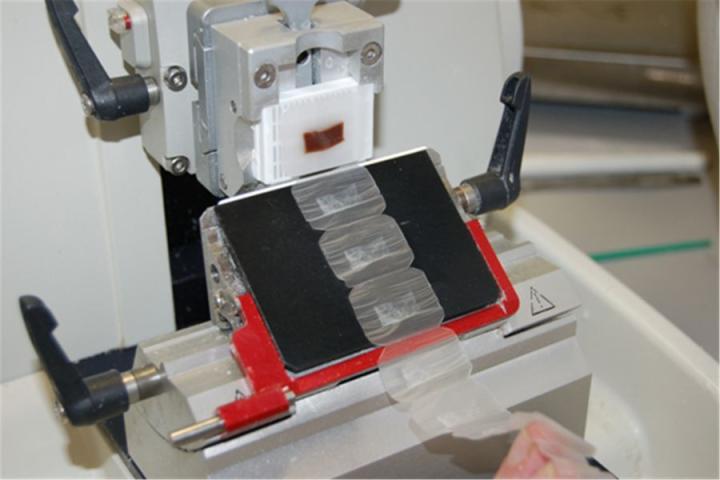
Sections are cut on a precision instrument called a “microtome” using extremely fine steel blades. Paraffin sections are usually cut at a thickness of 3 - 5µm, ensuring that only a single layer of cells makes up the section (a red blood cell has a diameter of about 7µm). One of the advantages of paraffin wax as an embedding agent is that as sections are cut, they will stick together edge-to-edge, forming a “ribbon” of sections. This makes handling easier.
Sections are now “floated out” on the surface of warm water in a flotation bath to flatten them and then picked up onto microscope slides. After thorough drying, they are ready for staining.


Staining
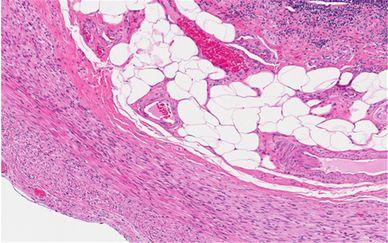
Apart from a few natural pigments such as melanin, the cells and other elements making up most specimens are colorless. In order to reveal structural detail using brightfield microscopy, some form of staining is required. The routine stain used universally as a starting point in providing essential structural information is the hematoxylin and eosin (H&E) stain. With this method, cell nuclei are stained blue, and cytoplasm and many extra-cellular components in shades of pink. In histopathology, many conditions can be diagnosed by examining an H&E alone. However, sometimes additional information is required to provide a full differential diagnosis, and this requires furthermore specialized staining techniques. These may be “special stains” using dyes or metallic impregnations to define particular structures or microorganisms, or immuno-histochemical methods (IHC) involving the location of diagnostically useful proteins using labeled antibodies. Molecular methods such as in-situ hybridisation (ISH) may also be required to detect specific DNA or RNA sequences. These methods can all be applied to paraffin sections, and in most cases, the slides produced are completely stable and can be kept for many years.
After staining, the sections are covered with a glass coverslip and are then sent to a pathologist who will view them under a microscope to make an appropriate diagnosis and prepare a report.


About the presenter

Geoffrey Rolls is a Histology Consultant with decades of experience in the field. He is a former Senior Lecturer in histopathology in the Department of Laboratory Medicine, RMIT University in Melbourne, Australia.
Related Content
Leica Biosystems Knowledge Pathway content is subject to the Leica Biosystems website terms of use, available at: Legal Notice. The content, including webinars, training presentations and related materials is intended to provide general information regarding particular subjects of interest to health care professionals and is not intended to be, and should not be construed as, medical, regulatory or legal advice. The views and opinions expressed in any third-party content reflect the personal views and opinions of the speaker(s)/author(s) and do not necessarily represent or reflect the views or opinions of Leica Biosystems, its employees or agents. Any links contained in the content which provides access to third party resources or content is provided for convenience only.
For the use of any product, the applicable product documentation, including information guides, inserts and operation manuals should be consulted.
Copyright © 2025 Leica Biosystems division of Leica Microsystems, Inc. and its Leica Biosystems affiliates. All rights reserved. LEICA and the Leica Logo are registered trademarks of Leica Microsystems IR GmbH.


